Hello everyone, here are some quick, practical notes on each practice I did over the past few weeks.
1. Chocolate: What I liked about this reference was the values in the paper, similar to aluminum, and the slight blue light right below the hazelnut. This “blue” colour is a reflection of white light, I think, also projected onto the paper. I played not only with cool tones but also with a bit of yellow, which was present in the reference but very slight, almost unnoticeable.

.
2. Market Shelf: Well, I wanted a challenge and this was one. To speed up the process a bit I used my perspective brush to emulate the reference point of view. On top of that I wanted to use rough lines to define big shapes which I later refined one by one. One important aspect of these practices is patience, sitting down and making small strokes for minutes or even hours. But once done, with such an intricate amount of information built only with lines, the next steps become less stressful as a big part of that beautiful look is achieved through the drawing.
After the drawing was done I simply split it into layers with similar complexity, like separating all the products from the background for instance. Then I used the hard edge brush to match the colours in the reference just by observing them. By the time I finished the colours I was pretty confident the piece would look cool to me even without shadows and lighting. Still I wanted to give it some extra highlight on top of certain reflective products. Finally I added some small textures around the areas I thought would catch the viewer’s attention, then a few colour adjustments to cheer up the vibe.

.
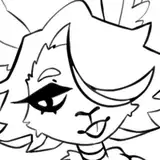
3. The Secretary: I love making characters but I’ve been quite focused on simple subjects like portraits with intricate values, mostly to get that nice realistic render. So I stepped a bit into more simple cel shading like the one used in animation. I wanted to focus on a slightly more complex composition where the line art captured something interesting through shapes, and then leave the values and colours very light and simple. The key for choosing references with this intention is that the individual in the picture is performing some action, like working or stressing out, as in this reference. That gives you some nice cloth folds to play with, either with lines or shadows. I also pushed the perspective a bit from the original reference, just to play around.

.
4. Bitten Pencil: I liked the subject, it felt nostalgic and the reference was simple yet had plenty of information through values. I thought this was a nice warm-up where I started with a simple render but eventually got ambitious adding more and more values. The takeaway here is how each material had different edge transitions between dark, middle and bright tones. They all shared some brush strokes from a brush called “cater,” but in general keep this in mind: different material means different edge treatment between shadows and lights.

.
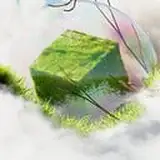
5. Sleepy Cat: I don’t know why but I wanted to go back to the simple render I used for the secretary. I felt the composition was interesting enough that the lines would do most of the work. I liked the cat’s gesture, the action (sleeping), the inclined shape of the box, the slight lighting across the whole composition. The picture was good enough that I thought it could be useful to change the perspective into something different, like what you’d see in an animated film or comic.
The challenge in this kind of render is to encapsulate key information in a single shadow layer. You can push the volume a bit more with soft shadows that are almost unnoticeable, but the main focus has to be the hard edge shadow. It looks simple but requires an understanding of volume and form that will be defined by a sharp silhouette. I see myself doing this more and more soon. I quite liked the result.

.
6. Cloth: I wanted to move a bit further with the simple render into a more complex subject like cloth folds. This picture had an interesting composition to me, the face cut in half by the framing, three different kinds of fabrics (I love the highlight on the jacket), an interesting gesture and strong top lighting. The takeaway here I would say is the drawing at the beginning. I was at the end of that day’s session and felt very comfortable with the previous two practices, so the way I was drawing the shapes felt loose and relaxed. I saw a similarity with some animation artists I really admire, where after years of hard work they manage to get a very organic look in their drawings. I felt I was getting good.

Practices 48-49 Process video: https://youtu.be/jsuyuYDviQc
Brushes: https://drive.google.com/drive/folders/1wHu8wuEHjDk-VfnZqv8iy8rwnvu8Ngmj?usp=sharing
.
Welcome to all new patrons. Remember you can now pre-order my book Life in Every Sketch on the 3DTotal shop.
https://rebrand.ly/The-Art-of-RamonN90

Please let me know if you have any questions, I’ll be happy to help with art advice or book details.
Ramon Nuñez
2025-07-30 04:15:59 +0000 UTCpear
2025-07-30 04:05:47 +0000 UTC