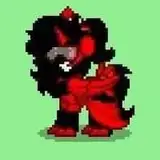
Hey everyone! In this post, I'm kicking off a three-part behind-the-scenes look at my 3D workflow, using the Demonicorn from Gori: Cuddly Carnage as the star of the show. This is Part 1, where we’re starting from the very beginning-from raw concept art all the way to a detailed high poly sculpt. If you’re curious about how ideas transform into full-fledged 3D models, this one’s for you.
Crafting the Concept: 2D Design That Sparks the Build
 Every awesome 3D model begins with a solid concept. This step isn't just important, it's everything. No matter how much effort goes into sculpting, a weak design will always limit the final result.
For the Demonicorn, the concept was created by our very own 2D artist, Caroline. She crafted the design based on input from the game designer (Me - LOL), making sure the character wasn’t just visually striking, but also practical for gameplay and production needs. That balance between style and function is absolutely key in game development.
However, the concept is more than just a guide. A great concept should light a fire under you. It should inspire, excite, and help you feel the project before you've even touched a single polygon.
Once the design is locked in, I take time to break it down and gather reference material. That’s where PureRef comes in. It's hands down one of my favorite tools for organizing visual references. If you haven’t tried it, I highly recommend it. And if you're able to, make a donation if you get it so we can keep getting updates to this amazing tool.
 Now on to my absolute favorite part, sculpting. ZBrush is my go-to sculpting tool, and this is where the real fun begins. I always start with the big shapes - the overall feel and silhouette of the character. This part is loose, fast, and exploratory. I don’t get too attached because it’s all about testing ideas and establishing a strong foundation.
Once the proportions and silhouette feels right, I begin refining. The key here is to gradually increase the resolution of the model. Jumping to high detail too early will almost always lead to blobby, uncontrolled results. Keeping things low-poly early on gives you the flexibility to make big changes without the sculpt falling apart.
Unfortunately, I didn’t record every step of sculpting the Demonicorn, but thankfully there are a ton of fantastic tutorials and resources online. Once you know what you're looking for, it's much easier to find guides that match your style and needs.

When it’s time to dive into the final details, I usually work top to bottom, cleaning things up, adding sharp accents, and pushing the sculpt until it starts to feel like a living, breathing part of the game world.
This is where great references and the styleboard really shines. For anatomy, make sure to use photographs instead of other renders. All artistic interpretation comes with distortion. An artist using art for references will bring distortion upon distortion and so on it goes.
In Part 2, I’ll take you through the next steps: building the low poly model, unwrapping UVs, and baking high poly detail into the final game-ready mesh.
I will describe the workflow for both Maya and Blender. The workflow for me is the same except that I'm using different tools with their own strengths and weaknesses.
See you there!
Angry Demon Studio
2025-03-31 08:48:16 +0000 UTCAngry Demon Studio
2025-03-31 08:47:36 +0000 UTC4E7AO
2025-03-30 05:58:53 +0000 UTCBICHUoHuck
2025-03-28 15:18:20 +0000 UTC