It is usually in the few days after the second pose pack release of every month that I have time to delve deep into my side hobbies (aside from posing). I have been using this time slot to no-life stablediffusion this month. I have made a few small discoveries and am beginning to form a workflow.
At the time of writing, I am a novice or intermediate-level at best, but due to quite a few requests, I have decided to pen this, both for interested parties and for myself, to summarize and cement what I have learned.


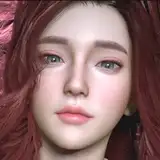
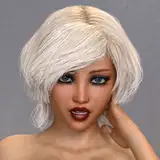
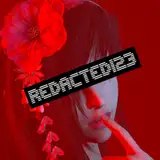
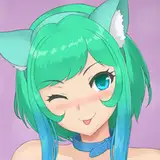
For this guide, I will walk you through my process for creating the image above. This guide will assume that you have installed SD and have at least played around with it to the point where you know what the major sliders do and can generate basic images. This guide also involves some basic photoshop processes. If you do not have photoshop, then stubbornly inpainting until RNGesus gives you what you want works too, most of the time.
For installation of StableDiffusion and basic controls, please see youtube or google. There are many guides for basics from people who actually know how to teach.
This is what I wrote in a previous post about your first steps into stable diffusion. Its what got me started and should help you:
"Here is the guide that I followed to install StableDiffusion. I stopped following at 5:10 and installed a model specializing in beautiful women instead 😜. The model and LORAs that I use are found here.
To make this worthwhile, you will need a decently powerful Nvidia GPU of at least 30 series or newer."
Now lets begin!
Step 1: Conceptualization
The first stage of image generation is to come up with a theme. The AI can throw so many different things at it that you can easily spend hours delving rabbit hole after rabbit hole and end up producing nothing (I have extensive experience with this issue).
For this project, I set out to produce a set of images featuring beautiful asian women in hanfu/fantasy fusion outfits posing by a body of water. I prompted for desert oasis because the yellow hues of the desert go very well with water and lush greenery in pictures, however, the AI generated a set of images set in a fertile river valley (just as good!)
Step 2: Scouting
The second step is to scout for candidates. Craft a prompt and quickly generate 50-100 low-resolution images. If the images don't look anything like what you had in mind, interrupt the process and refine your prompt. Please be sure to have a target final resolution in mind, because it would be wise to generate candidate images with the same aspect ratio. You can use something like https://calculateaspectratio.com/ or use the aspect ratio lock extension found in Extensions>Available. I tend to scout out for good stuff using 1/3 or 1/2 resolution. Which in the case of a 900x1400, is around 700p.
Here is the prompt that I used in this instance:
(best quality:1.3, masterpiece:1.3), ultra high res, physically-based rendering, wallpaper,1girl, beautiful, realistic, blurry_background, blurry_foreground, branch, brown_hair, plum blossom, depth_of_field,ultra realistic 8k cg, picture-perfect face,photograph, flawless, clean, professional artwork, famous artwork, cinematic lighting, cinematic bloom,rim lighting, two tone lighting,(high detailed skin:1.2), perfect face, beautiful face, beautiful eyes, ((perfect female body, narrow waist)),old trees, overhanging branches, flowers, intricate detailed clothing, ((bathing in a shining desert oasis, glimmering water, mid day, palm trees, fortress on a mountain in the background))), fluffy clouds in the sky, divine, slim legs, fantasy, dreamlike, unreal, science fiction, beautiful clothes, chinese, sheer top and tight skirt,pantyhose with lace trim, intricate detail, layered clothing, detailed embroidery, sexy, charming, alluring, seductive, erotic, enchanting, hair ornament, necklace, earrings, bracelet, armlet, high-heeled shoes, ulzzang-6500, intricate diadem, <lora:hipoly3DModelLora_v10:0.3> <lora:fashionGirl_v26:0.2>, style-keta-nsfw, aqueducts, hanging gardens, swans
(worst quality, low quality:1.3), more than two legs, simple background, logo, watermark, text, (fused fingers), (too many fingers),crossed fingers, more than two legs, ((panties)), small head, purple clothing
Steps: 30, Sampler: DPM++ SDE Karras, CFG scale: 7, Seed: 3957460632, Size: 463x720, Model hash: fedb2f1fbe, Model: 3Guofeng3_v32Light
For this type of image, there is no better model than GuoFeng3, which specializes in ancient eastern styles and is a good balance of CG and photorealistic. The Loras can be found on that same website.
Create a folder somewhere and call it something like "shortlist" to act as a storage for the good candidates that you want to work on. Comb through the generated previews until you find some interesting prospects and move them over to the shortlist folder. Here are some things I look for at this stage:
 See the full-size image above if the text is too small.
Depending on the model that you are using many of the poses may look samey. This is where "control net" and our beloved Illusion studio come in handy. Control net can analyze pictures and use those pictures as guides for composing and posing in stable diffusion. For more info on control net, please refer to youtube guides for now, as there are a lot of them out and adding it here would make this too long. I did not use controlnet for this picture.
For my projects, I like to pick 20-25 candidates. It would be best to pick a few more candidates than you plan to actually finalize, as some of the candidates will not make it past step 3. In my limited experience, it is best to aim for 10-20 final images, unless you have a lot of time and want to burn yourself out.
Step 3: Initial Up-scale
Now that you have your candidates, it is time to render them render them at the highest resolution that your V-Ram will allow. Now is the time when your GPU will prove it's worth. Mine is good for gaming but pretty poor for AI, so the highest that I can go is 900x1400.
A higher denoise value will make the resulting image sharper and even add smaller details that were not originally there, however, this can also cause the output to deviate in unwanted ways such as sprouting extra legs and fingers in extreme cases. A value that is too low will not give the AI enough freedom to fill in the extra pixels, resulting in a burry image. You will need to find the idea denoise strength for the amount that you are upscaling by. 0.6 is the sweet spot for me when upscaling around 2x.
The resulting images from your batch of three or more will all have defects and areas that you like a lot. I like the spend some extra time and perfect the image by compositing good outputs together to show only the best parts of each and to cover up the bad parts. This process of compositing involves layering each image on top of each other in photoshop and using masking to only let the good parts of each show through. You can find guides for layer masks in photoshop on youtube.
My composite which combines the strengths of each output was this:
I took the robes of one output, the background of another, and the belt of a third and smashed them together. All of the outputs had bad hands. I left the hands that were the least messed up. Now its time to fix the defects.
Step 4: Inpainting
This is by far the most time consuming step, as it involves a lot of luck. In order to fix the hands, we will need to send our composite (or single good-enough output) to img2img inpaint. We will use the same prompt. You will need to play with the denoise strength again, because the value you need depends on the size of the area that you are inpainting.
There are two modes of inpainting. One is called "Whole picture" and the other is called "Only masked." The whole picture mode will simply change the pixes that are in painted, while trying to maintain cohesion with the picture around it. The "Only masked" mode is very powerful and will render the inpainted area in a square using your entire resolution allowance and paste the result into the inpainted area. This will result in a much more detail than was originally in the in paint area. For hands, I like to use "Whole picture" as it maintains better cohesion with the rest of the picture, which is a priority for hands. For faces, I like to use "Whole picture" to make broad changes, such as changing the face entirely or to change the expression, and then in paint again over it using "only masked" to add detail and definition.
I will start by inpainting the hands in an attempt to fix them. Here are my values:

I was lucky. My first attempt yielded a decent prospect:

As you can see, one of the hands are still a bit mutated, but at least the other is in a pose and angle that looks passable. The slightly mutated hand can simply be accepted, or photoshopped over. I chose to photoshop the hand to look a bit better using a combination of the clone stamp tool, the liquify filter, and the paint brush:

Now it is time to fix the face. Stable diffusion is bad at drawing face details when it does not have enough pixels to play with. As the face is a small part of the overall image, the AI really struggled, and you can see this clearly in the half-baked eyes.
"But Freelancer604, we are already rendering at the max resolution that our graphics card can stomach, what do we do about this problem?"
Well, dont worry, this is where I teach you my patented super secret technique. (requires photoshop or other image editor). Throw your photoshopped composite or ideal inpaint output into IMG2IMG and look for the little pen icon at the top right of the box. This will let you img2img only part of the image.


Please note that you should really frame it like a portrait as opposed to zooming in on the face completely. This is because the AI is just as bad as rendering huge faces as it is at rendering tiny ones, for the same reason. Faces that span too many pixels do not match the training data that the AI was fed, so unspeakable horrors will be unleashed if you zoom too hard.
Optimal denoise strength will depend on the face LORAs you use and the model. I usually use 0.5 to start and adjust as I see the results. In this case, because we are exploding such small part of the image, a high denoise strength like 0.6 or higher will be needed.
After about 10 tries I finally go a face that I am happy with, and I added it to my image. To composite more detailed face onto the original image you will need am image editor that can handle PNG files, because transparencies are involved. Layer and resize the face so that it aligns with the old, and erase away the edges so that only the face and desired details remain but, no stark edges are visible.
Here is my result:
Step 5: Super Up-scale using Ultimate SD Upscaler
We are now at a state which is fit for release, but if you want to go one step beyond, we can upscale it again. Given the original image was roughly 700p, we will need a special tool to uplift it a second time without making things blurry. Most AI arists use the built-in SwinIR_4x or R-ESRGAN 4x+ in the "extras" tab at this point, but I find that these bulldoze over a lot of the minute details and make the image look like a painting or very plastic doll-like.
If you go to extensions > available, you can find a little gem called Ultimate SD Upscale. This is the holy grail of upscalers. It breaks the image up into small boxes and re-renders each, then stiches them back together. So you can truly upscale 2x again without losing native detail.
SD Upscale takes a long time, so this may not be worth it for you if you are doing a large number of images. You can find the image below on the image reel at the top of the page and zoom in to see the difference.
 Note how the SD upscale maintains more of a sense of depth to the face
Here are the settings that I use:

Here is the final image, you will not see a difference in this article, but you will if you inspect the full size image in the image reel above and zoom in:

Step 6: Final Touchups (optional)
You have now spent at least 30-60 min on this one image, so depending on how dedicated or insane you are, you can repeat step 4 all over again. Personally, I found the chest adornments lacking, so I redid that part:

I also used the Camera Raw Filter in photoshop to adjust the tone for more visual impact. After multiple upscales, the image has lost much detail in the bright areas due to overexposure. I used Exposure +0.10, Contrast +15, Highlights -45, Blacks -20, Vibrance +20 , Clarity +5, and Vignetting 20.
Here is the final result:

Conclusion
There we have it. That is everything I know on the topic of creating the best possible image using StableDiffusion at the time of writing. When I started this journey, I am sure that I would have been shocked at the amount of work that can go into a single AI image, given that automation is supposed to be.. automated. But the extra work really does elevate the result, and I hope you will agree, based on the image we have made.
There are people out there who can produce stuff that blows my mind, so I know that there are more streamlined and better processes out there. I am just sharing what little I know. I hope some of the insights above were or will be helpful to you. If you know something I do not, please share with the class below or via private message, as I am eager to learn.
ECCENTRiC
2023-04-01 03:04:33 +0000 UTC