How to Draw Cute Faces
Added 2025-08-25 23:41:34 +0000 UTCIn order to draw a cute anime face, one must first understand how it is connected to the real human face. In other words, one must understand its visual language and the meaning of the strange symbols making it up. This is something that I've had to learn on my own, and I've found that the more I can connect the two the better I get at actually drawing anime faces.
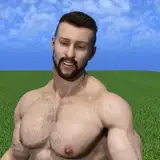
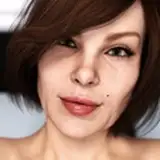
To get started, let's trace over the ideal starting point, Cilian Murphy's face.

Your typical anime style is an effort to make the most appealing face possible with the least amount of information. As you can see, I've already reduced the amount of information on his face drastically, but we're going to go much farther.
I've marked the important highlights and shadows on his face. Keep these in mind, but we can ignore most of them for this tutorial. Let's take a look at his face and see how it compares to your average moe anime girl. The most obvious difference is probably the eyes. They're small and close together. The tear duct is a massive protrusion, the eyelashes are individual hairs, and we can see the side of the eyelid on the bottom. The outline of his head is also the wrong shape and his regular-sized nose would look absurd. We're gonna have to make some changes.

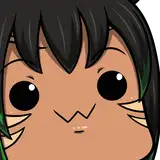
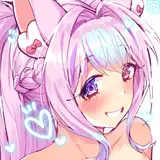
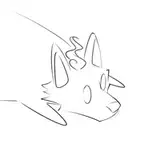
Moe characters have gigantic eyes and massive skulls, but tiny little chins. Let's alter his profile to fit that description.
We can see that, even though the cranium has been massively inflated and the chin has been shrunken to a point, the face still retains much of its original shape. We can still tell where the brow, cheekbones, jaw, and chin are supposed to be located. The outline isn't just a blob, there's a lot of information being condensed here and minor manipulations to the outline can greatly affect how a character looks.

Next up, the nose and mouth. These are easy! A small vertical line signifies the tip of the nose, and we can place a simple highlight where his nose is already highlighted. The mouth needs barely any changes, but we can make it smaller and cuter and move it up a little now that we've shrunken his chin.
A good way to visualize drawing the mouth is that you aren't actually drawing a mouth, you're drawing the implication of lips. By that I mean, you aren't drawing a line or a hole in the face, you're outlining the interior of the lips, this soft and very mobile 3D arch that sticks out of our face. To that end, let's exaggerate it a little, having it fade completely where the lips jut out in the middle and placing bulbous tails on either end where the lips sink into the face.
But wait, how are the eyes going to work? They're so small compared to an anime girl's, there's no way we can actually use them, right?

That's better! Now we can see exactly what we're doing. The size and position aren't that important, they'll change based on your artstyle and the character you're drawing anyway, the important part is that we can see how to translate real eyes into an anime artstyle. That said, the eyes are moved down slightly and expanded to fill the space they're given, leaving a massive gulf in between them. The eyebrows are similarly spread apart, and have almost the full height of the forehead to move across as they please. This is obviously horrifying at this size, so, to fix that, we're going to be removing more information!

And here's how! The tear duct is removed wholesale and the lower eyelid is consumed by the eye. The eyelashes and eyebrows are transformed into solid blocks rather than individual hairs. Surprisingly, the eyelid folds can be left the same. Eyelids come in all shapes and sizes, so look at what other artists are doing and experiment with them!
On the right side, we can see the eyelash broken down into parts. Imagine the eye as a ball, with the upper eyelashes being tightly wrapped just over the center and the lower ones coming near the bottom.
In the red section, our eyelashes stick out in front of the eye. They may stray up, above the eye, or down, covering the eye, based on the angle of the viewer and how open the eyes are, but from here most of them are facing dead ahead. In the green section, the eyelashes begin to swoop down to the right, covering the eye slightly and sticking off to the side. This creates those long pretty lashes you see at the corner. The purple tail section is not actually based on an eyelash, but instead the side of the eyelid, which we are now merging into the eyelashes. Finally, in the blue, our lower eyelashes. These are rarely given much definition, but on exceptionally pretty eyes they may be just as thick as the upper ones. For this character, it suffices to outline her iris and place a few hairs at the edge of either eye.

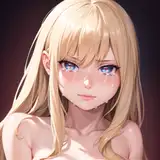
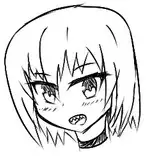
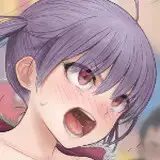
And with a few finishing touches, wow! What a cute anime girl you've become, Cilian Murphy! Of course, you should never actually use this process to draw a character, but hopefully understanding this will help you a little in your learning process. Once you know the rules of how faces work, then you can much more easily begin to break them.
At a later date, I'll be continuing this with a full color face tutorial, going over how to simply draw and shade your art in a way that will make it look appealing with minimal effort. I actually meant for this to be the opening of that tutorial, but it ended up longer than I thought so it has become it's own standalone thing.
Thank you so much for all of your support, I hope you look forward to the next tutorial!
Comments
I thought anime was based on cats and not humans.... i mean the faces.
Kiwegg
2025-08-26 12:07:00 +0000 UTCthanks
DV
2025-08-26 08:18:30 +0000 UTC