A New Way of doing 2D Isometric Games!
Added 2023-09-11 20:15:17 +0000 UTCWe've talked about it this past month, but Morningstar is undergoing a HUGE change in the way we deal with sorting and rendering our 2D game.
Basically transitioning over the entire art & rendering pipeline from our old 2D project into a new 3D scene that handles all of the sprite sorting, lighting, postprocess depth effects, collision, and coordinates.
This has wildly improved the visual fidelity of our game, taking us from a fairly bland visual experience to a much more color and shading rich appearance. But more than that, it has had significant performance improvements over traditional 2D layer sorting and cut possibly months of optimization & experimentation.
I would suggest to anyone doing an isometric 2d game -- don't.
Make your game 3D.
You can of course keep your hand drawn 2D sprites however, and enjoy all of the ease & visual appeal of hand drawn, or rendered, or otherwise created 2D art.
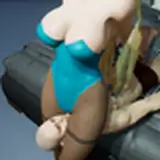
In the video above is a new tool in our unity project that allows us to place a 2D sprite into a 3D scene, coded by James this past weekend.
Initially, you can tell the sprite is in fact FLAT.
Just from the shadow being cast on the ground plane, you can tell that this sprite is simply hovering in the air. It has no depth information, so if a character tries to walk past it, they would break the illusion of 3D depth.

But with this system, the 2D object is actually projected onto a 3d Cube.
The origin of that cube is the little grey dot on the ground plane that tells the mesh, "this is the ground level."
Your sprite simply needs to be negotiated around until it visually matches the height you want your sprite to exist at on the world plane. Obviously your plants all need to have their origin at the base of their trunks, batteries on the flat part, etc etc.
Once you've placed your sprite, we generate a mesh with Fit to Bounds, which finds the nearest location the alpha ends in your raster image, and draws a line there. It then finds this for all the X,Y,Z coordinates.
Yes, it's a manual process, but easy. And as we get caught up with the bulk of our assets, it will be trivial. Better, it means modders can use this tool too which we can ship with our editor, without requiring a new skill in a 3d modelling software like blender.
The mesh, which is using a UV Projection to place the sprite on its faces, is then saved to a file, and linked in our XML files called "Symbols," which contain all the data regarding our object in the world, from its color masks and shader properties all the way down to how much it weighs in the inventory.
That mesh then batches its textures and can be GPU instanced, saving tremendous overhead compared to sprite renderers.
It obviously has a lot of alpha overdraw, which is an issue for sure, but its a tradeoff of this approach. Compare that loss of performance to the gains acquired not needing to sort layers algorithmically, for instance, or the confusion of finding Z-depth in a 2D project.
For more complex sprites, we use this method of manually creating geometry in Blender:

This is one of our Slate Cliffs.
Hugely complex sprite with tons and tons of layers.
Here is a shot with a little bit of perspective, of the WIP mesh I'm making.

And here is a basic breakdown of the scene.

There is a Camera set to:
- X: 60
- Y: 0
- Z: 45
To give us a true isometric view of our mesh, matching that of our sprites. That camera is in line with the center of the scene and moved back a little bit.

The camera position honestly doesn't matter so much. Only the location of the mesh at the center of the scene.
There is a Projector, which is using the texture we are to apply.
The Mesh has a UV Project modifier applied:

And that links to our material:

When you initially set this up, you should have something that looks like this:

All you have to do is negotiate the edges of your box into the shape of your sprite.

I like to start here. I find that helps me save a "Template" for all future meshes of this type to follow.

From here, you can see the live result of your 3D efforts. For simple sprites you can get away with simply pushing some verts and that should be enough.

If, like us on these cliffs, you need water levels that will absolutely reveal the fakery, you need to get a lot more specific.
This live projection method is still hard -- some of the hardest 3d work I've ever done honestly, but it's so, so much better than doing it blind and hoping your UV Projections work.
Don't even try to use 3dsMax for this. Or Maya. Blender has eclipsed them in the tools to do this by far.
I've watched A LOT of fellow indie devs working on isometric games over the last several years we've been doing pre-pro on Morningstar, and most of them have burned out and quit. The 2D workflow was simply abandoned in engines like Unity & Unreal, and isn't very good in Game Maker or Godot.
You CAN make an isometric 2D game in Unity. Check out games like Cantata out now on Steam.
But you'd be better off using a 3D approach from day 1.
That doesn't mean a game like StarCraft 1, Bastion, Hades, or The Banner Saga, using rendered or hand drawn 2D sprites, is a bad call. But what you can do to save yourself the struggle is look at this pipeline here and come up with similar methods, which will drastically slash your reliance on 3rd party plugins and bespoke solutions.


![개성인쥬스[pingkypen]](https://samukata.com/istorage/106895.jpg)