Hey! Some insights from past practices:
Orange Rocks:
I often warm up with simple references, but I went a bit off-track in these last practices. The first one was a contrasted and colourful landscape, in which the light creates a wide range of oranges and desaturated purples.
My process started by choosing the tone I thought was most present across the composition—the middle tone, a desaturated orange. Then I guessed the position of the darkest parts (shadows), and finally the brighter spots. By roughly defining these three aspects, I could then proceed to position each layer in a way that matched the reference's composition, mostly looking at big, recognisable shapes—like rocks, for example—as a guideline. This can be quicker using lines and Photoshop’s measuring tools, but the challenge for me is becoming more accurate just by looking.

After that, I simply add tones. Whether darker or brighter doesn’t matter—I move around the image in a kind of controlled chaos, guessing colours and values that feel similar, and then using those to capture specific features from the reference. This is a more complex version of what I usually do. The main difference is the number of values and colours I added after defining the light, mid-tone, and shadow from the start. Once I feel I have enough information in terms of value and colour, I paint over all the previous layers on a new one for refinement and texture. I took extra time to explain this one because it was a bit complex to achieve, but definitely possible if you break it down into manageable steps.
.
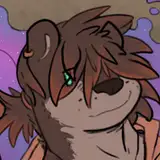
The Horse:
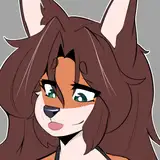
I believe the hardest part here was mostly the line art. The shapes really caught my attention—especially the gesture of the foal showing its anatomy, the muscles and bones, and the opportunity to push the silhouette to evoke that oval dynamism I like when painting organic subjects like humans or creatures. I went a bit far with some bluish and purple touches, just to bring a different feel to the less saturated parts of the body—just for fun, I guess.

.
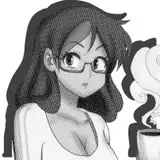
The Hand and Lemon:
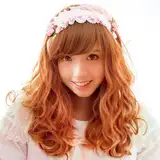
I keep forgetting to try unconventional references—not just the visually striking or traditionally challenging subjects, but also themes that aren’t necessarily the kind you'd see in an art school assignment. Still, I find them useful—especially when the human body is involved. It’s always good to practise drawing and painting hands; they really are difficult and gave me a bit of a struggle during the drawing process.

I started by trying to match the hand proportions from the reference, but after enough tries and not finding something I liked, I just warped the drawing until it felt comfortable. I think the end result was good enough. As for the colours, I probably could’ve stuck to a simple palette for the hand and focused more on the lemon, but I ended up playing around with many tones and values. I think I was in a good mood for experimenting that day.
.
The Camera:
This was another big challenge. The complexity in terms of values was technically tough, but since the colour palette was literally grey, I thought that would balance things out. I didn’t overcomplicate it by trying to match the exact position of every little camera part. Instead, I focused on the big shape, then slowly worked in the smaller shapes within it. I think it’s easier to understand by watching the video than reading my words.

Most of the work here went into values—I picked values for the shadows that felt similar to the picture but saturated them slightly with cold colours to bring some vibrancy. I believe that as long as the painting has a balanced range of values, the drawing doesn’t need to be geometrically precise. This combination of rough drawing and detailed rendering feels authentic to me.
.
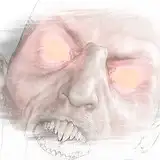
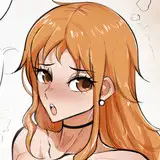
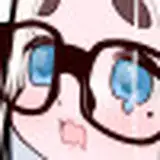
Baby:
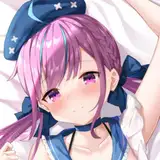
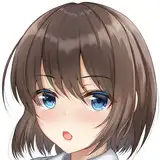
Who wouldn’t want to paint a baby taking a shower in a bucket? I thought it was cute, so I made the line art as simple as I could. In my opinion, using line art to define expressions tends to age characters, so even though the baby in the reference had very distinctive facial expressions, I rendered them using lighter values and colours rather than relying on dark linework.

The baby didn’t come out as smooth as in the reference, but that was on purpose—I chose to add values using a hard-edged brush with no blending between strokes. As you know, blending is what creates that smooth effect, but I made this decision because I wanted to recreate a similar look using a different combination of colours and values. I don’t think I nailed it completely—the baby looks a bit rough—but I still liked the result.
.
Landscape:
Similar to the previous approach, I wanted to capture this beautiful landscape using hard-edged strokes for both colour and value choices. I think this came as a consequence of the camera practice, where I started using this method. I believe it forces you to be more mindful of your colour choices, which is a great skill to sharpen.

I find myself using fewer and fewer Photoshop tools and attempting to do more with just a few brushes. Maybe in a year or two, I’ll end up using only one brush. Whatever happens, I hope I keep having fun.
Process Videos: https://youtu.be/62jF-cnGbCM
.
If you missed the Kickstarter campaign for my book Life in Every Sketch, you can now pre-order it on the 3DTotal shop.
https://rebrand.ly/The-Art-of-RamonN90

Please let me know if you have any questions—I’ll be happy to help with art advice or book details.
Thank you for your support!