

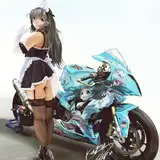
Ya fav spunky Final Fantasy girl! Well, she's my favorite spunky girl...
I've wanted to do Rikku for a while now, since I had done Yuna in the past. Out of all the FFX-2 girls I felt I suited Rikku best. Overall this cosplay was fairly simple, and I was lucky to find a swimsuit to modify which saved me a lot of time.
The most difficult part was probably the 'shoes'. I had to make sock-like things which was sort of annoying.
Read on if you'd like to see how I made this cosplay!
Photo: https://www.instagram.com/thekaigan/
Materials
Wig
The wig wasn't to difficult. I bought a ponytail wig from Arda that came with 1 long pony tail clip. I bought a second small pony tail clip as well. I had some extra wig in the same color from an older cosplay that I used to harvest hair for all the braids.
The first thing I did was make a total of 7 Braids:
I used hot glue to secure the ends, I also hot glued the long skinny braids so they formed figure 8s.

Before attaching any of the braids, I made beads from fimo clay. I sculpted them around the braids and once I was happy with them I dunked them in boiling water for a few minutes to cure them. Be careful not to get the glued ends in the boiling water, or it will be a mess.
I then glued the 2 small braids to the wig near the nape of the neck. For the pony tails, I crimped parts of the long pony and cut it to the desired length. The short one was teased and spiked a bit.
I also trimmed the bangs of the wig.

The 3 braid loops are secured onto the top of my head with bobby pins and the short pony tail clip. The 2 long braids are attached in the teeth of the small pony tail clip. The headband is just a stretchy rectangle sewn into a headband. Easy!

Earrings
I bought some earring hoop/hook things and some red wire. I super glued some feathers together, then wrapped them with wire so I could loop them around the earring part. Once done, I secured the wire with more super glue and done!

Scarf
I bought a few meters of white ribbed cotton and made a long rectangle 'tube" I cut strips on the bottom and tied them. That was it for the sewing.
To dye it, I first dip dyed the scarf yellow, leaving some white near the bottom. To the yellow dye, I added some orange and dip dyed that. I rinsed out the color and let it dry.
The next day I did the same for the orange, dip dying and adding a bit of red. Finally I dip dyed the middle area red.

This process took around 3 days and was mostly waiting. Just make sure you buy fabric in a light color and in a 100% cotton.
Bikini Top and Bottoms
I bought a bikini from Ardens (cheap teen's store in Canada) and modified it. I trimmed the bottoms so they were smaller and got rid of the bands around the hips. I put orange bias around the edges and added some bias tie-strings.
The tie strings didn't end up working out, so instead I added stretchy ties and that worked much better.

The same process for the top, except I removed the underwire and added it back in after I put bias all around the cups.
The halter strap is pleather, sewed on. For the tie in the front, I added eyelets with my hole punch and eyelet punch.
The strap in the back is just the same stretch cord I used on the bottoms.

Here is them bikini before I switched the ties for stretch cord:

Sleeves and Gloves
The gloves were simple, I just traced my hand and sewed the fabric pieces together. I used brown leather paint to add some weathering.

For the sleeves, I made a base sleeve to glue all the bows to. Then I made 10 bows from little rectangles of fabric. It took a while.
Once I sewed them all, I airbrushed them with some light brown paint. I then glued them on to the sleeve base.

Skirt
I just sewed a tube of stretch fabric to fit my waist area.
For the orange details, I glued some thick interfacing on the inside of the skirt before adding eyelets and threading the cord through them.

Belt
I had a real hard time finding some fabric for this. I ended up using some yellow outwear fabric. Belts are simple to make. The pouches were made with a pattern like this one.
You can adjust the measurements and dimensions, but that is a basic pattern. If you wanted to make them stiffer, use cardboard or craft foam and cover it with the fabric.
My pouches are non-functional.

Both the belt and pouches were weathered with leather paint.
Boots
These were the most challenging part of the build.
I bought some slide on white shoes that I shaded with my airbrush. I also painted the bottoms a dark blue color.
For the 'sock' part, I first traced a sock for a pattern, then sewed one for each foot. This will be the base where I build all the details on. For the 'boot' part, I made a rectangle that was smaller at the bottom so it could be attached to the sock. I interfaced the rectangle and made sure it was sandwiched between the fabric. I checked to make sure it fit on the sock.
The white details are just bias tape and the center part is just glued on and sewed down. The back ribbon is just bias tape threaded through eyelets and tied in a bow.
Once the details were done, I sewed the boot part to the sock. I was unhappy with how the sock looked, so I cut out the tip and sewed in some white fabric and was happier with it.


Daggers
I 3D printed these. The files are here. They took over a whole role of filament to print. The files call for a dowel for extra security. I think I should have sized mine down 10% to15%
Once everything is printed, I assembled them and glued them together with super glue. I then filled the gaps with wood filler. Then began the long road of sanding.

Sand everything until your happy with it. You can also spray them with spray primer and sand more. I didn't for these, I used wood glue to prime them.
Paint em, seal em, and wrap the handles in some leather-ish fabric and your done. The silver 'blade' edging was done with a paint marker.

A
2019-08-15 21:09:59 +0000 UTCScorpion Tim
2019-08-15 17:12:24 +0000 UTC


